How do I apply the polarising filter?Updated 5 months ago
The Polarising Filter is designed to reduced the glare on your windscreen as seen through the Dash Cam, allowing you to record the road ahead clearly. In bright sunlight the filter will also enhance the colour and contrast levels to help capture important number plate details.
Remove the adhesive layer on the back of the Polarising Filter, and apply the filter to the front of the Dash Cam lens, making sure that the text (”140° Wide Angle Lens”) is at the top of the lens. Also ensure that you remove the protective layer over the lens before using your Dash Cam.
Adjusting the Polarising Filter
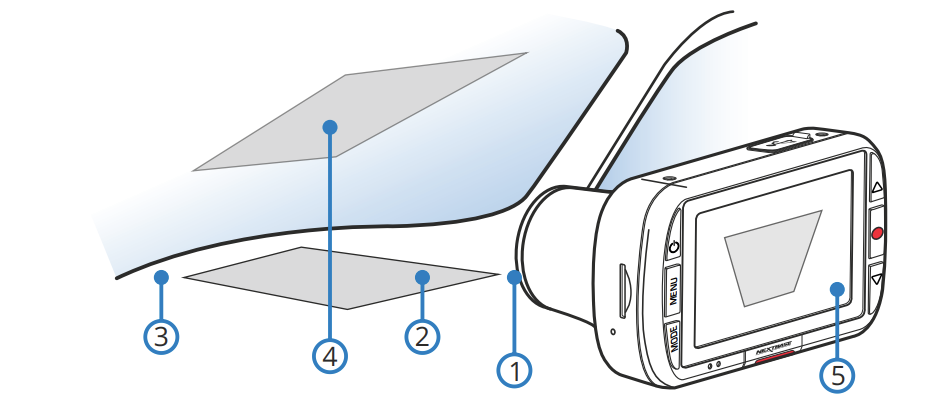
The most effective way to set up your Polarising Filter
(1) is to place a piece of plain white paper
(2) on your dashboard
(3) under the rear view mirror.
- With your camera turned ON you will see the reflection (4) of the paper in the LCD screen of the Dash Cam. Look at the reflection (4) on the windscreen through the Dash Cam display (5).
- Gently rotate the front bezel to adjust the filter. Rotate the filter until the windscreen reflection is as hidden as possible on the Dash Cam display (see below). Once the reflection can no longer be seen, operate the Dash Cam normally. Please note; it may not be possible to fully remove the reflection, but using the Polarising Filter will noticeably improve your video quality.
Thanks for stopping by!
We love hearing from our customers, and we'd love to get your feedback to further improve your experience with us. Let us know how we're doing, or contact our support team ([email protected]) if you need further assistance from us.